Arcane library is an exploratory project with the purpose to learn more about UE5.1, game development techniques, industry standard software and processes. This project is the culmination of following tutorials and courses online. Below is a full breakdown of the project and the resources used. All 3d models and most textures were created from scratch and only a few Megascans materials were used.


Phase 1: Planning and Modelling
Software: 3ds Max with the following scripts/plugins: Book Manager, TexTools and TurntoInstance.
Tutorials used:
https://www.artstation.com/marketplace/p/8O1qz/large-game-environment-creation-in-depth-tutorial-course-ue5 (by Emiel Sleegers)
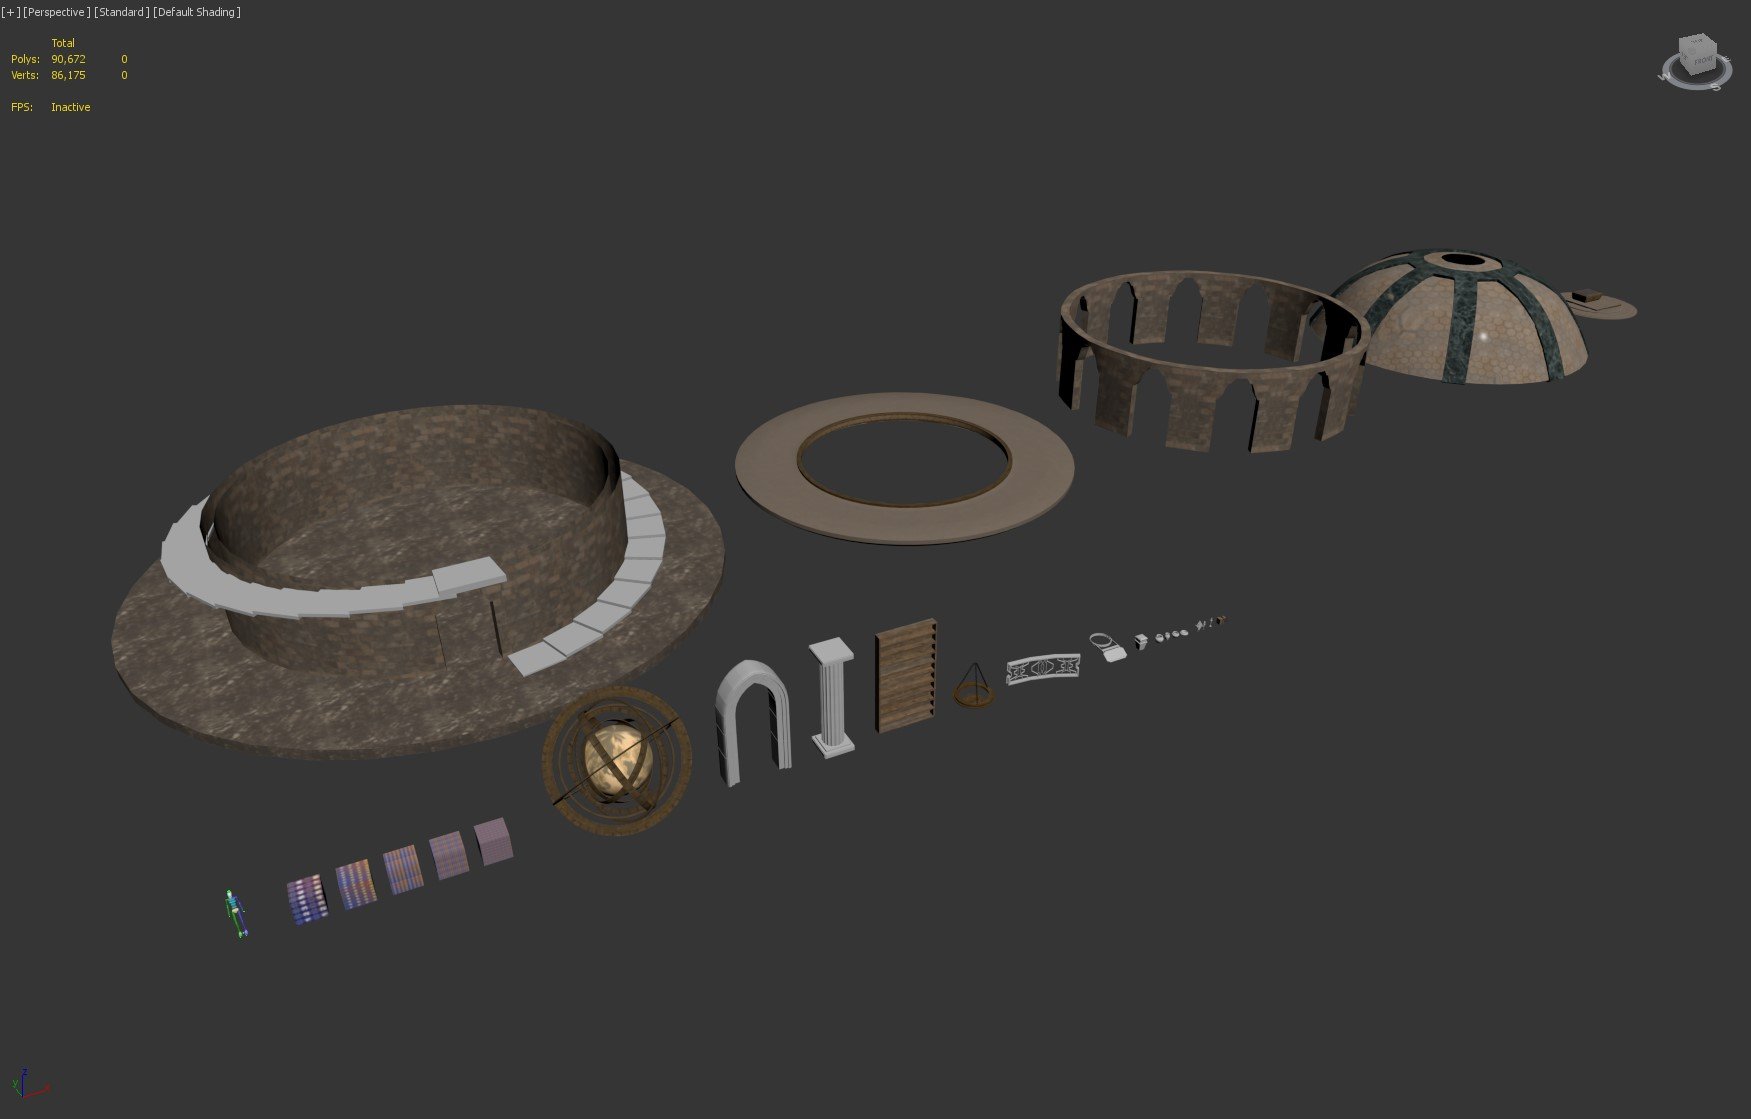
This in-depth tutorial by Emiel Sleegers is an exceptional guide on building large environments in UE5. Although it is created using Maya any 3d artist can follow along with their preferred software. The first step for a project of this scale is to gather as many reference images as possible. I used ArtStation and basic Google searching to find inspiration and loaded all the images into PureRef for easy management. After gathering references I picked a single image to shape my concept and used it to identify all the critical modular pieces I needed to build the library. I also used other reference images to identify small and medium props I could scatter around scene. To get started, I blocked out the environment using standard primitives, when I was happy with the overall scale and placement I started to refine the models, largest to smallest. To help with scale and visualization I did 2 things: First, I created a 6ft tall biped for reference and dragged it around the scene when I needed to visualize scale in reference to a humanoid. Second, I created 5 1-meter cubes each with their own texel density (2.56, 5.12, 10.24, 20.48 and 40.96). I assigned a texel map to these cubes which helped me figure out what texel density I should aim for and how I could combine UV maps to conserve memory. In the end, I decided on a texel density of 5.12 for large and medium props and 10.24 for main props (like the ornate books). I identified which models would receive trim textures, which needed to be sculpted in ZBrush and which ones could go straight into Substance Painter. I used the plugin Book Manager to randomly scatter books around the shelves and floor, TexTools to ensure consistent texel density and TurntoInstance to propagate instances when needed. Most of the 3d models in this scene are instances, which helps keep memory usage, file size and resources manageable as the project grew.
Phase 2: Trim Sheet Creation
Software: 3ds Max, Substance Designer and Painter.
Tutorials used:
https://www.youtube.com/watch?v=WTWCj7mcsIU (by Javier Perez)
https://flippednormals.com/downloads/old-chair-full-creation-process/ (by digital-hunky)
Javier Perez's tutorial was extremely helpful in learning how to use Substance Designer to create trim sheets. I was able to create a reusable template where I can simply plug in repeatable alphas to create completely new sheets, which is very useful for future projects. I augmented Perez’s tutorial with my own steps at the end using 3ds Max and Substance Painter, but Perez's instructions served as the foundation. After completing the tutorial I went into 3ds Max and created a high poly plane and plugged the trim sheet height map into a displacement modifier to generate a 3d high poly version of the trim sheet. I used this geometry inside Substance Painter to bake textures and create more wear and tear variation. Basically, I used Substance Designer to create the trim sheet height map so I could create geometry for it in 3ds Max and texture everything in Substance Painter. The reason for this workflow is because I liked using the node based editing system of Designer to get my patterns set up, but I prefer the experience of using Painter for applying and editing textures. After the trim sheet was complete I applied it to my geometry in 3ds Max using only the diffuse map and made minor adjustments to the geometry and UV maps where needed.
Phase 3: Sculpting Large Props
Software: ZBrush.
Tutorials used:
https://www.youtube.com/watch?v=_yKGfcp2z3k&list=PLOE_PmntUXJ4dYZ9cSS0O84GFjOTTC0c2&index=5&t=658s (FlippedNormals)
https://www.youtube.com/watch?v=pCjzgYuS6WQ&list=PLOE_PmntUXJ4dYZ9cSS0O84GFjOTTC0c2&index=2 (Gatz 3D)
https://www.youtube.com/watch?v=SKvPIkND1yI&list=PLOE_PmntUXJ4dYZ9cSS0O84GFjOTTC0c2&index=3&t=187s (Michael Wilde)
I am fairly new to ZBrush and the last time I used it was in 2020 so I had to watch some beginner tutorials again to get reacquainted with the software. I chose to sculpt the pillars and arches for this project because I wanted to learn the workflow of sculpting and baking details on medium sized props. I created the low poly models in 3ds Max, sculpted edge damage in ZBrush and baked the textures in Substance Painter. While baking textures in Substance Painter I found that I had artifacts around my UV seams and no matter what smoothing I applied to the models the artifacts would not go away. After some research I discovered the “hard edge” terminology, meaning that each UV shell needs to have its own smoothing group and that UV seams need to be placed very thoughtfully. After adjusting the low poly seams, I applied a 3ds Max modifier called Weighted Normals and enabled Use UV Maps. This removed the seam artifacts and gave me a very clean bake in Substance Painter. I used a Wacom tablet with ZBrush, which is how it is meant to be used, not with a mouse and keyboard.
Phase 4: Prop Textures in Substance Painter
Software: Substance Painter, Photoshop and Texture Set Combiner (https://christena.gumroad.com/l/TextureSetCombiner).
Tutorials used:
https://flippednormals.com/downloads/old-chair-full-creation-process/ (by digital-hunky)
https://www.youtube.com/@Substance3D (official Adobe Substance 3d channel)
This phase was straightforward, I painted all of my small and medium sized props using Substance Painter (e.g. books, pots, book readers, altar, candles, railings). A preview of the books can be found here: https://www.artstation.com/artwork/vJg2K6. I used photos I took in a library in Ho Chi Minh city to create the ornamental patterns. The chair tutorial by digital-hunky is a comprehensive guide on how to achieve photo-realistic results with wood, it is a tutorial I regularly visit to refresh my Substance Painter techniques. The workflow I used is not exactly the typical way to use Substance Painter. I chose to combine all the props into one FBX export and used the material selector to hide and show the objects. Using this workflow requires the use of 3rd party software to combine the texture exports at the end. I used Texture Set Combiner by Christen Abma to combine all my Substance Painter exports when I was finished painting.
Phase 5: 3ds Max to UE5.1 using Datasmith
Software: 3ds Max and UE5.1 with the Datasmith plugin enabled.
Tutorials used:
https://www.youtube.com/watch?v=xAeEBhlAtYo&t=1015s (official Unreal Engine channel)
This phase was the fastest (and easiest) to finish. Datasmith is an UE plugin that can easily transfer geometry and materials from 3d applications to UE. I used Datasmith to only imported the geometry because all of the material set up was done inside UE. Any changes I made in 3ds Max were very quickly updated in UE with a simple export and update of the Datasmith asset. Throughout this project I had many iterations to the scene so using Datasmith was essential to quickly send my 3ds Max changes to my UE project.
Phase 6: Adding and Applying Materials
Software: UE5.1.
Tutorials used:
https://www.youtube.com/watch?v=7pgnClqCmAA&list=PLOE_PmntUXJ5hnTH0XvqA4JKbvunxFhqF&index=20 (Alexey Fedorov)
https://www.youtube.com/watch?v=1Oq3Y-TJrEw (Jon Gianelli)
Importing and applying the materials separately from Datasmith was my desired approach because Datasmith is not quite there yet in terms of transferring materials perfectly. For example, VRay materials are transferred with so many extra nodes and complicated setups, it is easier to rebuild the materials inside UE and use Datasmith only for geometry. I also found that material changes of a Datasmith import can be overwritten with new imports, thus erasing previous work, this can be frustrating. After understanding the limitations and quirks of Datasmith I was able to find an optimal workflow that was iteration friendly and effective. Using the Adobe Substance suite makes it very easy to export materials for UE with the AO, Metallic and Roughness maps packed perfectly in the RGB channels. I relied on Datasmith to for updates to geometry, UV maps, prop placement and material ids, and Substance Painter for textures. One thing I discovered early was that when importing the packed map into UE I needed to uncheck the RGB settings and set its color space to Linear in the material editor. This is an essential step and if not performed then materials can look shiny or oily.
Phase 7: Refine Scene and Add Animations
Software: UE5.1.
Tutorials used:
https://www.youtube.com/watch?v=D1pQrctHqEM&list=PLOE_PmntUXJ5hnTH0XvqA4JKbvunxFhqF&index=19 (Retro Gamer)
https://www.youtube.com/watch?v=px1QxFr8wzg&list=PLOE_PmntUXJ5hnTH0XvqA4JKbvunxFhqF&index=21&t=1378s (Reids Channel)
https://www.youtube.com/watch?v=5kltaGld6fQ&list=PLOE_PmntUXJ5hnTH0XvqA4JKbvunxFhqF&index=21&t=6s (official Unreal Engine channel)
https://www.youtube.com/watch?v=i0KE6dAlVgg&list=PLOE_PmntUXJ5D47hxgnphlDC8tWEr5Dvx&index=35&t=18s (Matt Aspland)
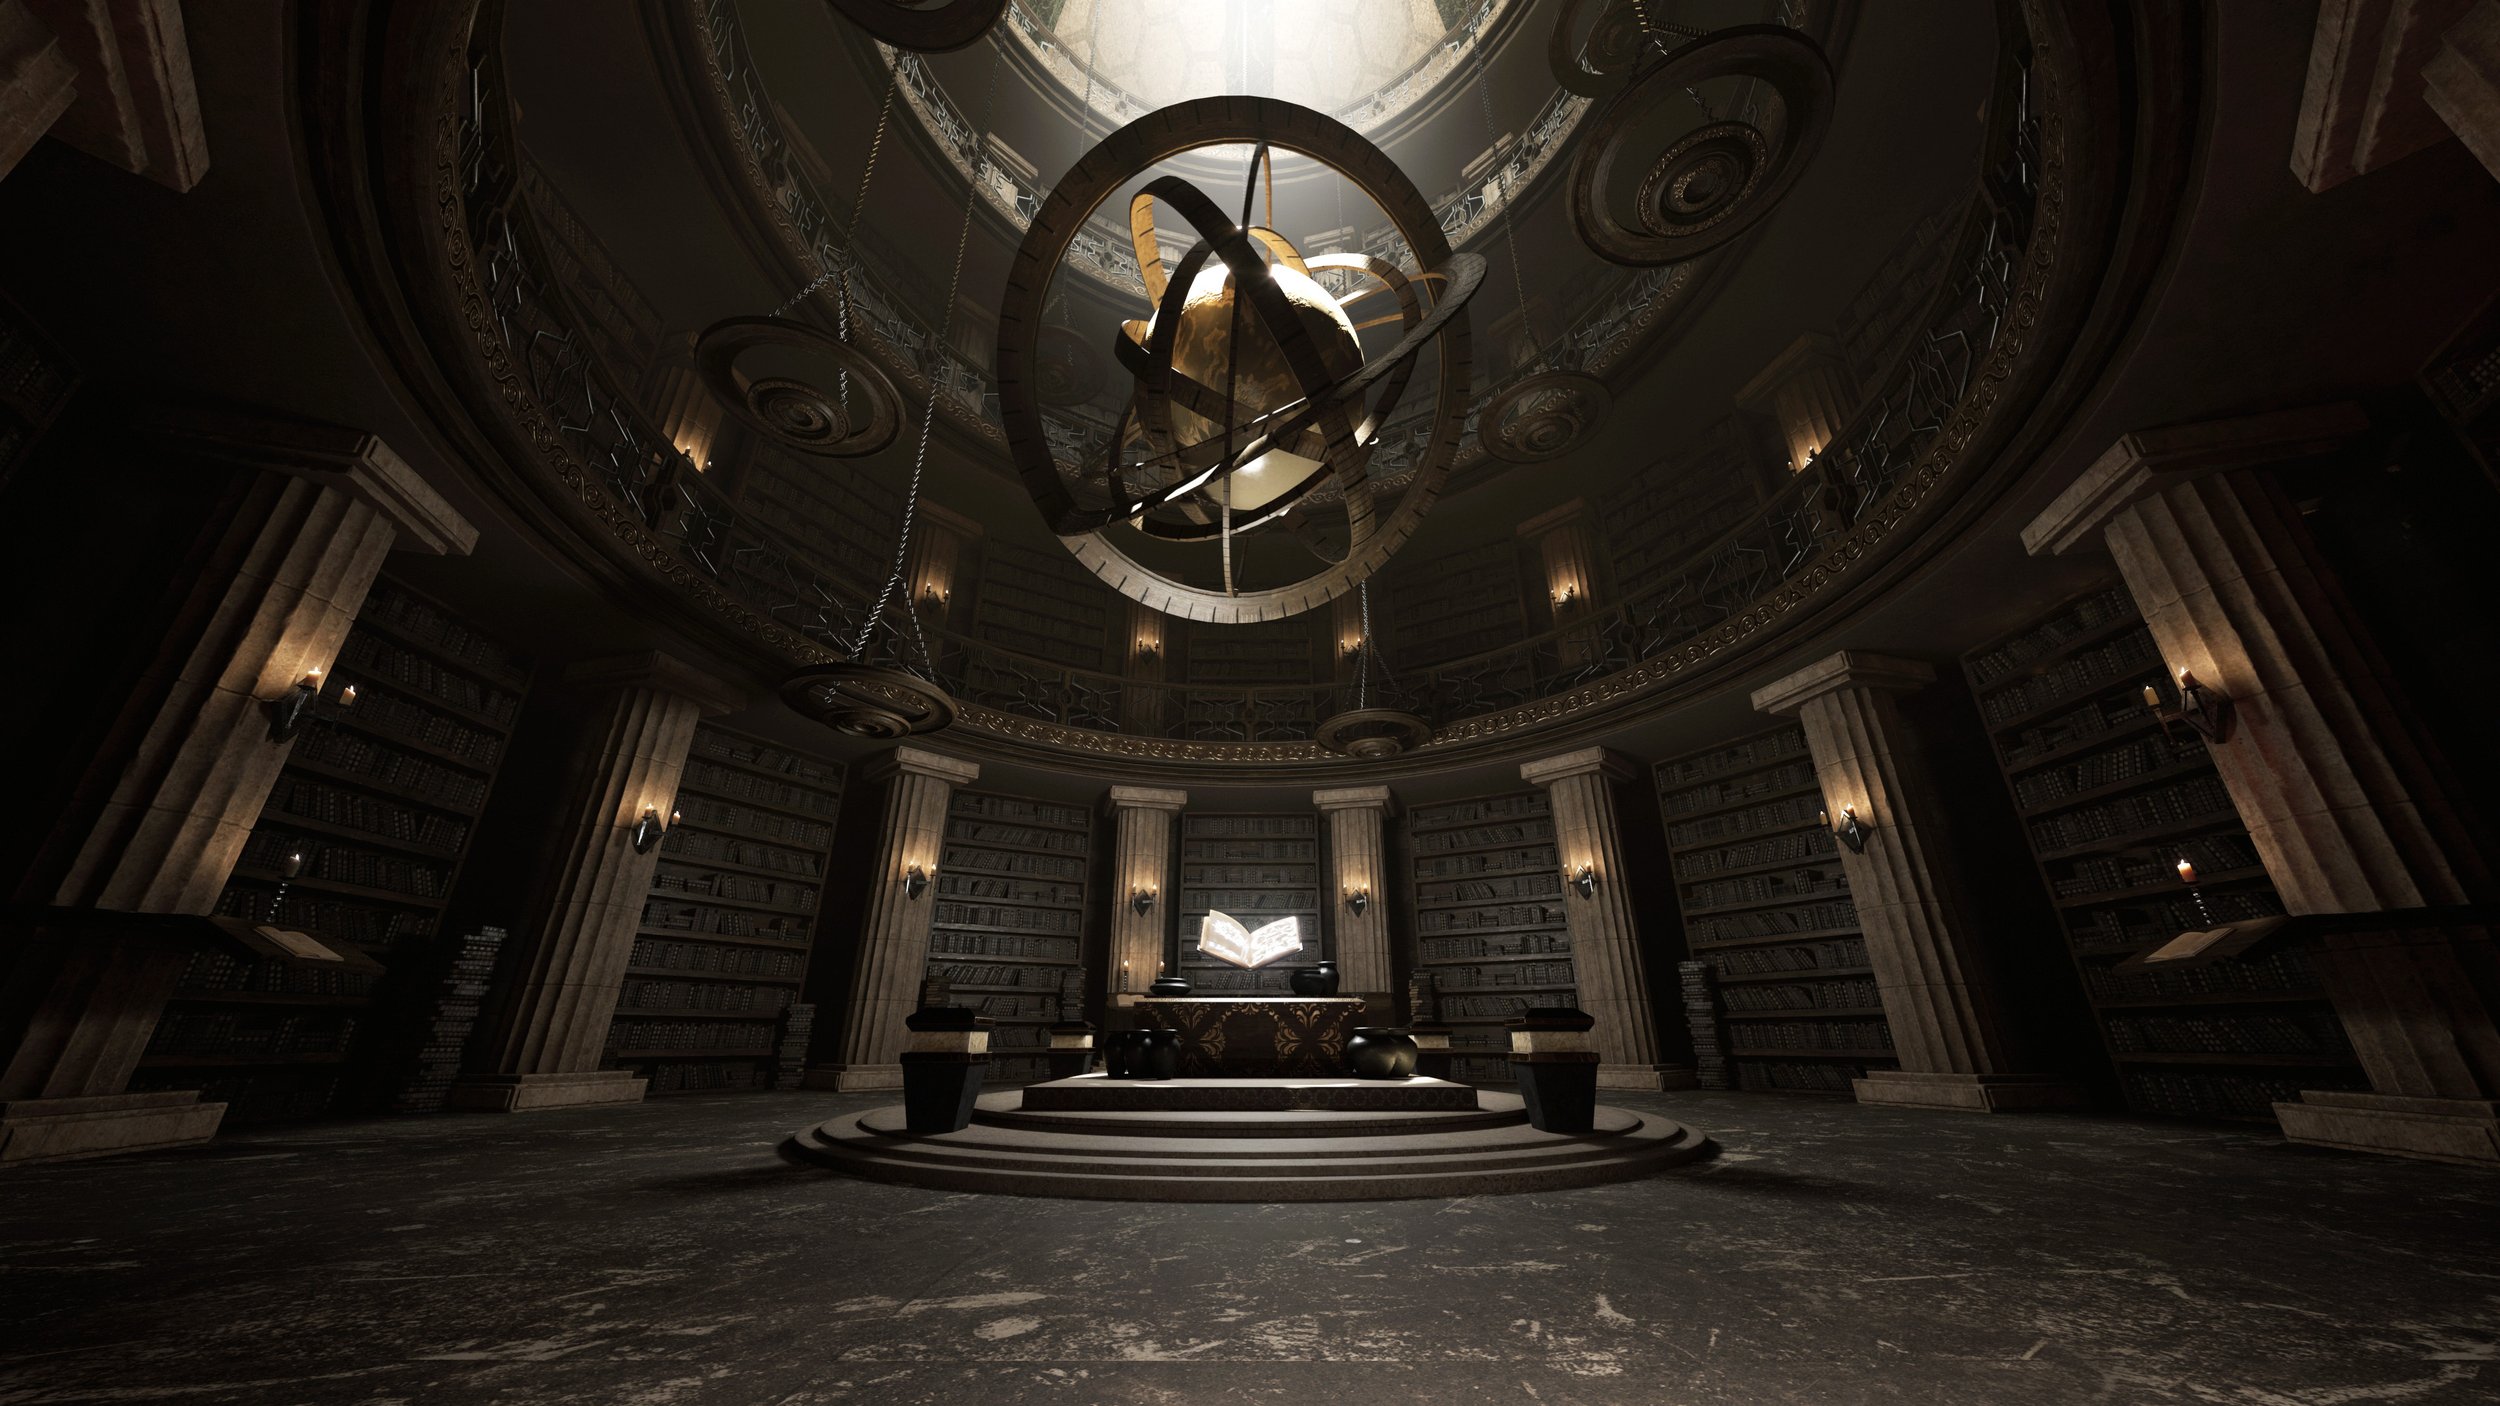
This phase of the project was very involved. I started with the lighting, atmosphere, post-processing and I studied Blueprints and basic animation. I wanted to create a dark atmosphere dimly lit with candles with a single light shaft down the center of the tower. To create the light shaft I could not rely on the Directional Sun alone. Instead, I created a spotlight with a low exponential height fog and increased the Volumetric Intensity until the light shaft was visible. This allowed me to keep the fog low while having a strong light shaft. If I relied only on the Directional Sun to create my light shaft the light would illuminate the entire scene, it is difficult to achieve good light shaft balance for interior scenes unless using other lights. For the simple animations like the hovering book or rotating atlas, I followed the above tutorials. They were very easy to follow and produced the results I needed.
Phase 8: Create Cameras and Render Stills and Movies
Software: UE5.1.
Tutorials used:
https://www.youtube.com/watch?v=HsX104SEyiE&list=PLOE_PmntUXJ5D47hxgnphlDC8tWEr5Dvx&index=34 (MR3D-Dev)
https://www.youtube.com/watch?v=KLbzNS5Oya4&list=PLOE_PmntUXJ5D47hxgnphlDC8tWEr5Dvx&index=35 (MR3D-Dev)
Setting up the cameras was quick and easy, I picked the angles I wanted by piloting the cameras and created a folder for all the still shots and a folder for the videos. I enabled the Movie Render Queue plugin in UE and created sequences for each shot. The camera animations were simple but helped me learn how to use the sequencer curves menu. I ran into some issues with motion blur causing some objects animated with the sequencer to be blurry. I discovered that if an object is animated using a blueprint then it is not affected negatively by motion blur. I had to convert some sequencer animation to blueprints at the very end to fix these issues. Finally, I used Premier Pro to create the videos from the image sequences.
The mage built his tower without doors, exits or entrances. Only him and his loyal acolytes could enter and leave freely. The tower was a trove of arcane secrets concealing his most destructive spells and nefarious alchemic manuals. Books written in long forgotten languages stacked in a hasty fashion implied a rabid hunger for cabalistic knowledge. There was one book, however, curiously large floating above an alter in the center of the room. This book was special, it's ink enchanted with a devious spell. Anyone other than the mage himself who attempted to read from this book was blinded by the shimmering text. The cruel insurance policy ensured rival mages and ambitious disciples could only read enough of the book to be plagued with wonder and curiosity as they pondered the mage's power and intentions in perpetual darkness.